DIY air quality monitor

In July 2019, I was living in Bangkok, Thailand, and that year recorded as the worst year for smog in the history of the city. Bangkok is one of the top 10 cities globally with the most polluted air. The most severe pollutant is PM2.5, fine dust particles less than 2.5 micrometers in diameter. They are just big enough to travel through air without getting stopped by air molecules but small enough to get into the bloodstream from lungs, causing inflammation and many health issues.
I used to live in a condominium in downtown Bangkok, and on especially hazy days, buildings 300 meters away were lost in smog. This was not healthy. I wanted to measure the air quality inside my apartment and in places I used to spend the most time in - office and gym. The only problem was that all air quality measuring devices were sold out! It was almost impossible to buy a reliable air quality monitor due to extremely high popular demand.
DIY
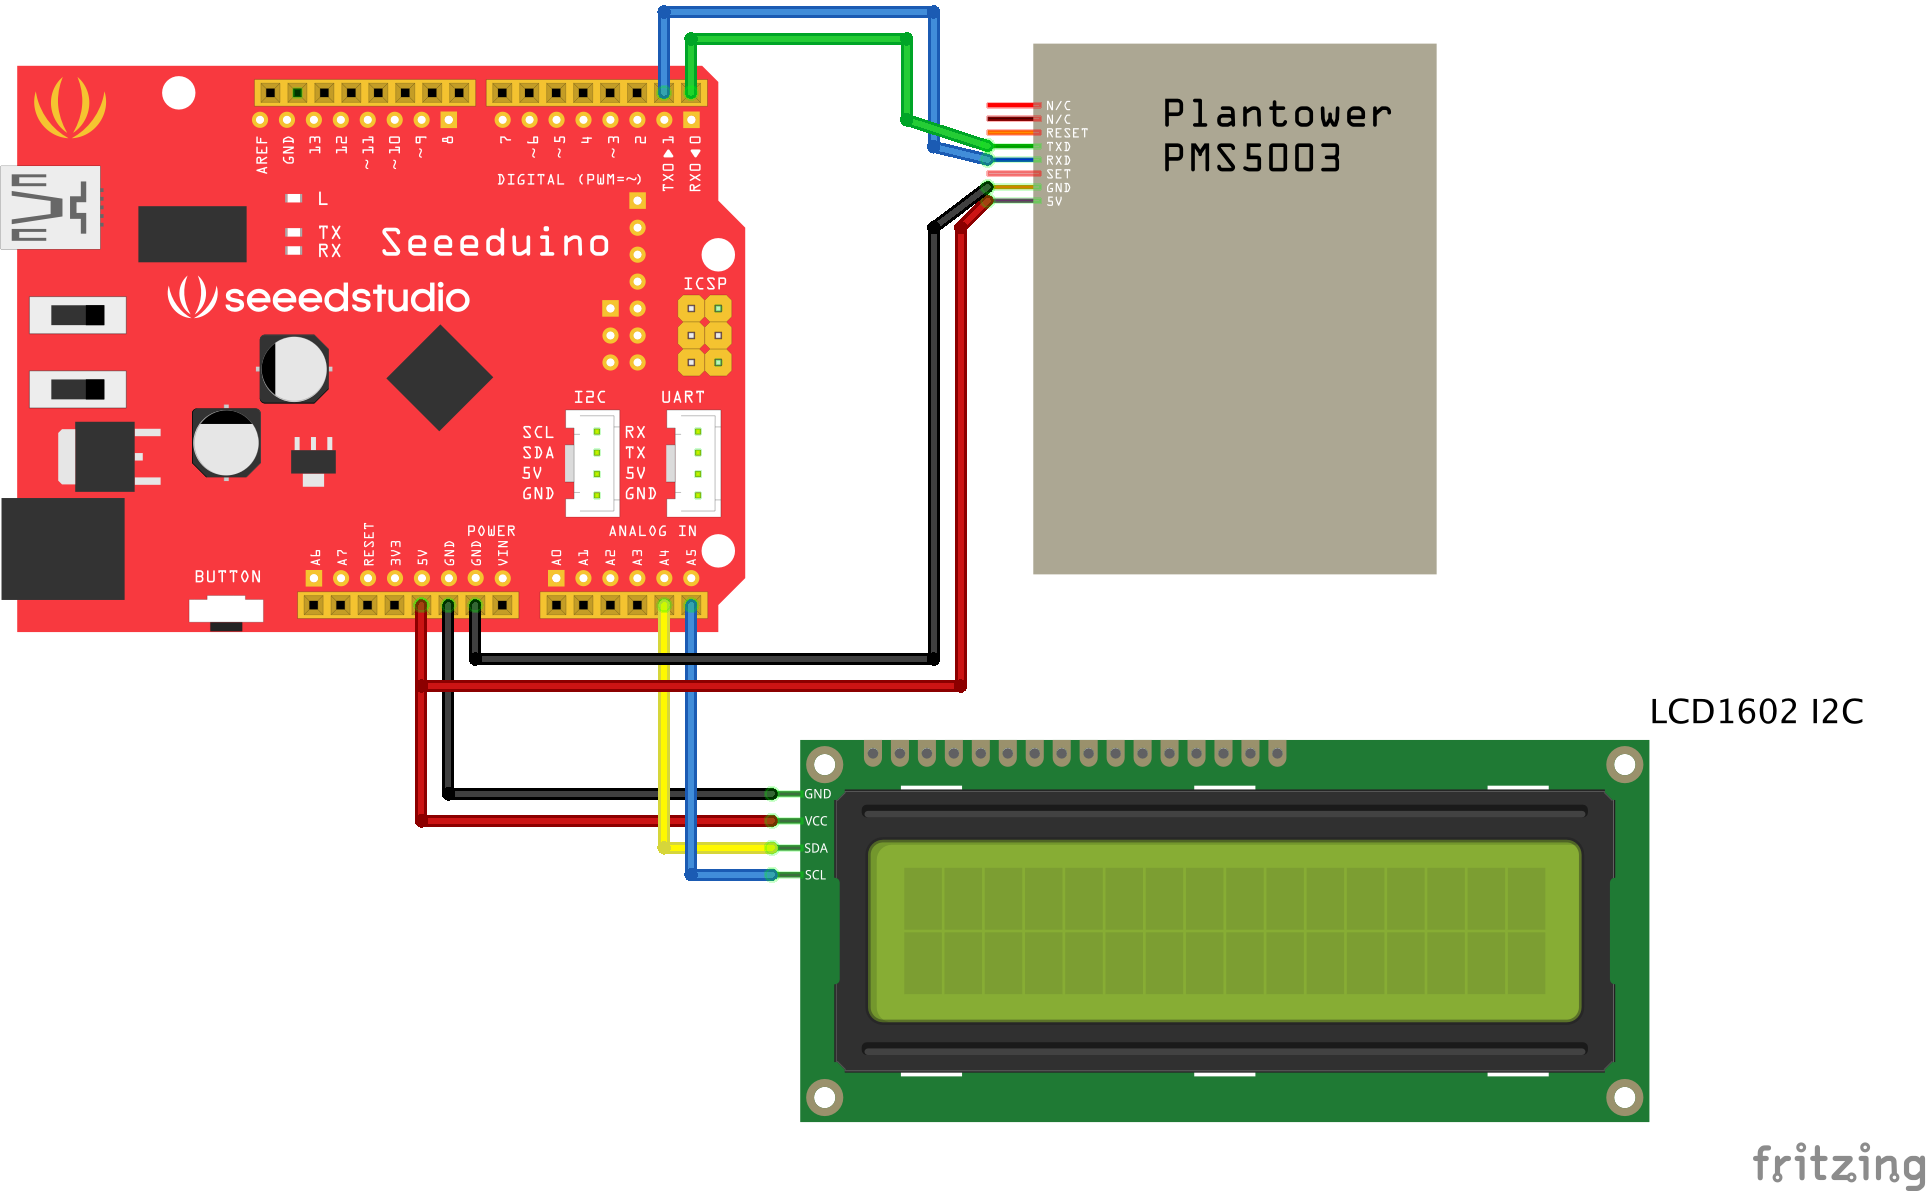
I decided to make an air quality monitor myself. I already had a spare Speeduino (Arduino-compatible board), and an LCD display. All I needed was a good sensor. After reviewing the market, I stopped on Plantower PMS 5003 laser sensor, which I ordered from AliExpress for 15$. It can accurately measure PM2.5 concentration in the air.

When it arrived, it became obvious that I needed scissors and a soldering kit to connect the sensor to my Arduino because the cord that comes with the sensor was incompatible with my board.
I used the sensor’s datasheet to map the pins
| PMS5003 pin | Arduino pin |
|---|---|
GND |
GND |
5V |
5V |
RX |
TX |
TX |
RX |
After solving the hardware tasks, now it was time for the software.
According to the datasheet, the data is streamed as frames of the following format via Serial with 9600 bps rate
struct DATA {
    uint16_t framelen;
    uint16_t pm10_standard, pm25_standard, pm100_standard;
    uint16_t pm10_env, pm25_env, pm100_env;
    uint16_t particles_03um, particles_05um, particles_10um, particles_25um, particles_50um, particles_100um;
    uint16_t unused;
    uint16_t checksum;
};
pm10_standard, pm25_standard, pm100_standard- concentration in \(\mu g / m^{3}\). The calculation of the concentration of the particles depends on the air density. Air density changes with variation in atmospheric pressure, temperature, and humidity. These values are normalized for the US standard atmosphere.pm10_env, pm25_env, pm100_env- concentration in \(\mu g / m^{3}\) in the ambient air as it is now.particles_03um, particles_05um, particles_10um, particles_25um, particles_50um, particles_100um- number of particles in 0.1 L of air.
In my case, both pm25_standard and pm25_env were more or less the same, so I decided to use pm25_env without spending too much time thinking about it. I think those values may start to diverge under extreme heights or temperatures.
After spending a few hours writing a driver for Arduino, I finally got my first readings.
Air Quality Index (not really)
The air quality is often measured and reported in AQI (Air Quality Index), with higher values indicating worse air pollution. The AQI for PM2.5 is based on a 24-hour average concentration. When PM2.5 levels change quickly, the 24-hour average is slow to respond. I didn’t want to wait for hours to collect enough data, so instead of showing the real AQI, my device shows projected AQI based on the current readings. It’s probably stupid, but it works for me 😃
US Standard AQI formula
\[I = \frac{I_{high} - I_{low}}{C_{high} - C_{low}} \cdot (C - C_{low}) + I_{low}\]- \(I\) - AQI
- \(C\) - the 24-hour average pollutant concentration
- \(C_{low}\) - the breakpoint that is \(<=C\)
- \(C_{high}\) - the breakpoint that is is \(>=C\)
- \(I_{low}\) - the AQI value corresponding to \(C_{low}\)
- \(I_{high}\) - the AQI value corresponding to \(C_{high}\)
US Standard AQI breakpoints for PM2.5
| Category | AQI | PM2.5 (\(\mu g / m^{3}\)) 24-hour average |
|---|---|---|
| Good | 0 - 50 | 0 - 12 |
| Moderate | 51 - 100 | 12.1 – 35.4 |
| Unhealthy for sensitive groups | 101 - 150 | 35.5 – 55.4 |
| Unhealthy | 151 - 200 | 55.5 – 150.4 |
| Very unhealthy | 201 - 300 | 150.5 – 250.4 |
| Hazardpis | 301 - 400 | 250.5 - 350.4 |
| Very hazardous | 401 - 500 | 350.5 - 500.4 |
I wrote a function to compute AQI
#define LEVELS 7
const float Cl_pm25[] = {0, 12.1, 35.5, 55.5, 150.5, 250.5, 350.5};
const float Ch_pm25[] = {12, 35.4, 55.4, 150.4, 250.4, 350.4, 500.4};
const float Il_pm25[] = {0, 51, 101, 151, 201, 301, 401};
const float Ih_pm25[] = {50, 100, 150, 200, 300, 400, 500};

float computeAQI(float c) {
  for (int level = 0; level < LEVELS; level++) {
    if (c <= Ch_pm25[level]) {
      return ((Ih_pm25[level] - Il_pm25[level]) / (Ch_pm25[level] - Cl_pm25[level])) * (c - Cl_pm25[level]) + Il_pm25[level];
    }
  }

  return -1;
}
After preparing a code to print data on the LCD display, I uploaded the final code to Arduino, and - voilà, it works. It shows PM2.5 concentration and projected AQI. At this point, the MVP is ready. It looks sloppy, but hey, it gets the job done.
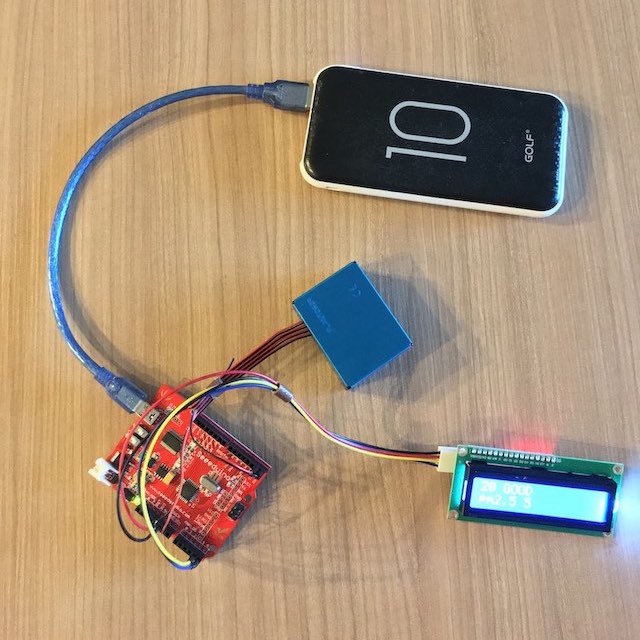
The projected AQI in my apartment was on Unhealthy for sensitive groups level, so I ordered an air purifier. Then I used my new DIY air quality monitor to validate that the air purifier is actually removing PM2.5 particles from the air. I found that after an hour, the air purifier drops the projected AQI down to Good 🎉 It works!
The complete source code of this project is on GitHub.
I left 3D printing an enclosure for another day and never managed to get back to it. Instead, I sent the MVP to my parents to Siberia. Each summer in Siberia brings vast forest fires. My parents are using this monitor to watch air quality indoors, and my father made a wood case to make the device look less offensive to the palate.